If tutorials available on this website are helpful for you, please whitelist this website in your ad blocker😭 or Donate to help us ❤️ pay for the web hosting to keep the website running.
नमस्कार दोस्तों , आप सभी अच्छे हैं , आज आप इस topic में सीखेंगे कि Laravel Application में कैसे firebase API की help से push notifications send कर सकते हैं।
एक simple popup message होता है , जो आपके mobile या browser पर show होता है। Push Notification मैं purpose users को time to time update करना। यह users के लिए एक reminder की तरह work करता है , जिससे user experience और traffic बढ़ता है।
तो चलते हैं और देखते हैं कि कैसे laravel में push notification implement करे हैं।
So , किसी भी तरह का push notification send करने के लिए हमें user device का device token की जरूरत होती है , बिना device token के notification send नहीं कर सकते हैं।
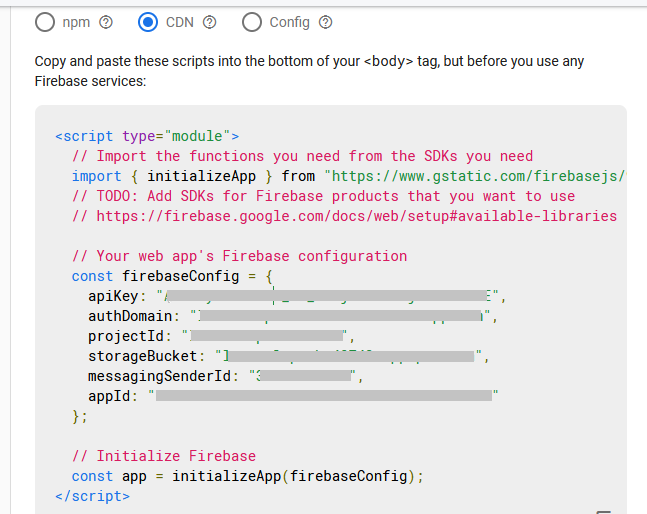
इसीलिए सबसे पहले आपको console.firebase.google.com पर account बनाना है। ताकि हमें user device का token मिल सके।
account बनाने के बाद या बनाते समय आपको project create करना है , और project create time आपको कुछ private और secret keys मिलेगी जिन्हे आपको किसी file में save करके रख लेनी हैं। जैसा की नीचे image में दिखाया गया है।
अब हमें laravel project को install करना है। project install हो जाने के बाद आपको .env file में database credentials set करने हैं और उसके बाद आपको php artisan migrate command run करना है जिससे user table बन सके।
1. Install project :
composer create-project --prefer-dist laravel/laravel pushnotification

2. Set database credentials in .env file :
DB_CONNECTION=mysql
DB_HOST=127.0.0.1
DB_PORT=3306
DB_DATABASE=pushnotification
DB_USERNAME=root
DB_PASSWORD=

3. Finally run below command :
php artisan migrate
By default user table में device token store करने के लिए कोई field नहीं होता है , तो हमें migrations create करके एक field बनाना होगा जिससे device token को store कर सकें। extra field field add करने के लिए नीचे बके steps follow करें।
php artisan make:migration alter_table_users
अब database / migrations / date_time_alter_table_users.php file Open करें और नीचे गया गया code replace करें।
File : database / migrations / date_time_alter_table_users.php
<?php
use Illuminate\Database\Migrations\Migration;
use Illuminate\Database\Schema\Blueprint;
use Illuminate\Support\Facades\Schema;
class AlterTableUsers extends Migration
{
    /**
     * Run the migrations.
     *
     * @return void
     */
    public function up()
    {
        Schema::table('users', function(Blueprint $table){
            $table->string('device_token')->nullable(true)->default(null);
        });
    }

    /**
     * Reverse the migrations.
     *
     * @return void
     */
    public function down()
    {
        Schema::table('users', function(Blueprint $table){
            $table->dropColumn('device_token');
        });
    }
}
code replace करने के बाद again php artisan migrate command run करें , और database check करेंगे तो device_token field users table में add हो जायगा।
Add these routes in routes/web.php
---------------------------------

//send web push notifications to user
Route::match(['get', 'post'], 'send-notification', 'App\Http\Controllers\HomeController@sendNotification')->name('send.notification');
// save user token to send push notification
Route::post('save-token', 'App\Http\Controllers\HomeController@saveToken')->name('save.token'); अब जो routes में HomeController use किया है उसे बनाना पड़ेगा। और उस controller के अंदर हम अपना logic लिखेंगे।
File : database / migrations / date_time_alter_table_users.php
<?php
namespace App\Http\Controllers;
use DB;
use App\Models\User;
use Illuminate\Http\Request;
class HomeController extends Controller
{
	/**
     * Save device token
     * @return JSON
     */
    public function saveToken(Request $request)
    {
        //we are inserting a dummy user with valid token.
        User::updateOrInsert(
            ['device_token' => $request->token] ,[
            'name' => 'Dumy User',
            'password' => bcrypt(123456),
            'email' => 'dummy@gmail.com',
            'device_token' => $request->token
        ]);
        return response()->json(['success'=>true, 'message'=>'token saved successfully.']);
    }

    /**
     * send push notifications to user
    */
    public function sendNotification(Request $request)
    {
         if($request->isMethod('post'))
         {
	$rules = [
	    'title' => 'required',
	    'message' => 'required',
                 ];

               $this->validate($request, $rules);

                 $firebaseToken =DB::table('users')->whereNotNull('device_token')->pluck('device_token')->all();
	$data = [
		"registration_ids" => $firebaseToken,
		"notification" => [
		       "title" => $request->title,
		       "body" => $request->message,
		]
	];

	$dataString = json_encode($data);
	$headers = [
	   'Authorization: key=SERVER-API-KEY',
	   'Content-Type: application/json',
	];

	$ch = curl_init();
	curl_setopt($ch, CURLOPT_URL, 'https://fcm.googleapis.com/fcm/send');
	curl_setopt($ch, CURLOPT_POST, true);
	curl_setopt($ch, CURLOPT_HTTPHEADER, $headers);
	curl_setopt($ch, CURLOPT_SSL_VERIFYPEER, false);
	curl_setopt($ch, CURLOPT_RETURNTRANSFER, true);
	curl_setopt($ch, CURLOPT_POSTFIELDS, $dataString);

	$response = curl_exec($ch);
	curl_close($ch);
                 return back()->with('response', $response);
          }

        return view('send_notification');
    }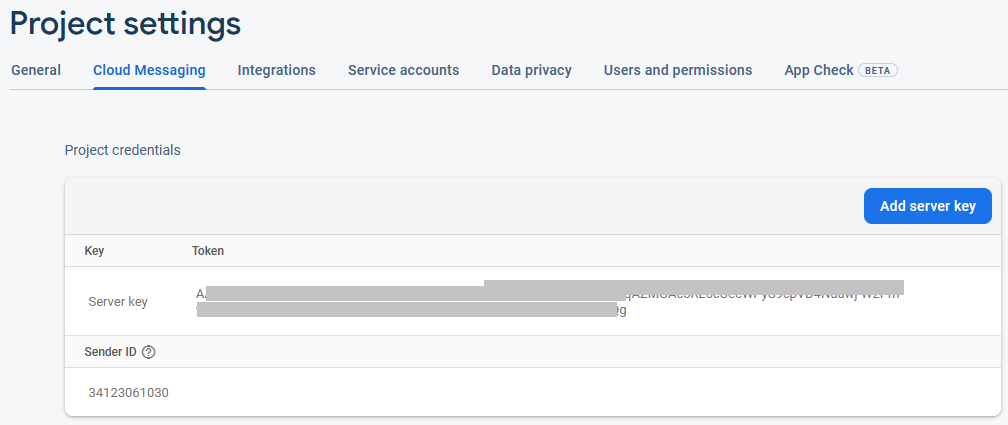
}Controller में आपको firebase server api key set करनी है , जो आप Firebase Dabshboard से ले सकते हैं।
<!DOCTYPE html>
<html lang="en">

<head>
    <title>Send Web Notification</title>
    <meta charset="utf-8">
    <meta name="viewport" content="width=device-width, initial-scale=1">
    <link rel="stylesheet" href="https://maxcdn.bootstrapcdn.com/bootstrap/4.5.2/css/bootstrap.min.css">
    <script src="https://ajax.googleapis.com/ajax/libs/jquery/3.5.1/jquery.min.js"></script>
    <script src="https://cdnjs.cloudflare.com/ajax/libs/popper.js/1.16.0/umd/popper.min.js"></script>
    <script src="https://maxcdn.bootstrapcdn.com/bootstrap/4.5.2/js/bootstrap.min.js"></script>
    <meta name="csrf-token" content="{{csrf_token()}}">
</head>

<body>
    <div class="container">
        <div class="row">
            <div class="col-sm-8">
                <button class="btn btn-success btn-lg align-center" id="allow_not_btn">Allow Notification</button>
                <br>
                <form class="form-sample jquery_form" action="{{route('send.notification')}}" method="post" enctype="multipart/form-data">
                    @csrf

                    <div class="form-group">
                        <label class="form-check-label">Title</label>
                        <input type="text" class="form-control" name="title" placeholder="Enter Title">
                    </div>

                    <div class="form-group">
                        <label class="form-control-label">Message body</label>
                        <textarea rows="4" class="form-control" placeholder="Enter Message" name="message"></textarea>
                    </div>

                    <div class="form-group">
                        <button type="submit" class="btn btn-primary mr-2">Submit</button>
                        <button class="btn btn-light" onclick="history.back();">Cancel</button>
                    </div>

                </form>

                <br>
                @if(session()->has('response'))
                <pre>Firebase API Response :
                            {{session()->get('response')}}
                        </pre>
                @endif
            </div>
        </div>
    </div>

    <script src="https://www.gstatic.com/firebasejs/8.3.0/firebase-app.js"></script>
    <script src="https://www.gstatic.com/firebasejs/8.3.0/firebase-messaging.js"></script>

    <script>
        $(function() {
            const firebaseConfig = {
                apiKey: "************",
                authDomain: "app-name-*.firebaseapp.com",
                projectId: "app-name-*",
                storageBucket: "app-name-*",
                messagingSenderId: "***********",
                appId: "***************"
            };

            firebase.initializeApp(firebaseConfig);
            const messaging = firebase.messaging();

            $('#allow_not_btn').on('click', function() {
                messaging
                    .requestPermission()
                    .then(function() {
                        return messaging.getToken()
                    })
                    .then(function(response) {
                        $.ajaxSetup({
                            headers: {
                                'X-CSRF-TOKEN': $('meta[name="csrf-token"]').attr('content')
                            }
                        });
                        $.ajax({
                            url: '{{ route("save.token") }}',
                            type: 'POST',
                            data: {
                                token: response
                            },
                            dataType: 'JSON',
                            success: function(response) {
                                alert('Token stored.');
                            },
                            error: function(error) {
                                alert(error);
                            },
                        });

                    }).catch(function(error) {
                        alert(error);
                    });
            });

            messaging.onMessage(function(payload) {
                const title = payload.notification.title;
                const options = {
                    body: payload.notification.body,
                    icon: payload.notification.icon,
                };
                new Notification(title, options);
            });
        });
    </script>
</body>

</html>
Finally अब आपको public directory में publicfirebase-messaging-sw.js File बनानी है।
File : publicfirebase-messaging-sw.js
// Give the service worker access to Firebase Messaging.
// Note that you can only use Firebase Messaging here. Other Firebase libraries
// are not available in the service worker.importScripts('https://www.gstatic.com/firebasejs/7.23.0/firebase-app.js');
importScripts('https://www.gstatic.com/firebasejs/8.3.0/firebase-app.js');
importScripts('https://www.gstatic.com/firebasejs/8.3.0/firebase-messaging.js');

/*
Initialize the Firebase app in the service worker by passing in the messagingSenderId.
*/
firebase.initializeApp({
    apiKey: "*******************",
    authDomain: "app-name.firebaseapp.com",
    projectId: "laravel-ap-*",
    storageBucket: "app-*",
    messagingSenderId: "*******8888",
    appId: "*****"
});


// Retrieve an instance of Firebase Messaging so that it can handle background
// messages.
const messaging = firebase.messaging();
messaging.setBackgroundMessageHandler(function (payload) {
    console.log("Message received.", payload);

    const title = "Hello world is awesome";
    const options = {
        body: "Your notificaiton message .",
        icon: "/firebase-logo.png",
    };

    return self.registration.showNotification(
        title,
        options,
    );
});
ये सब set करने के बाद php artisan serve command run करें , फिर http://127.0.0.1:8000/send-notification URL hit करें। वहां पर सबसे पहले आपको Allow notification button पर click करना है। उसके बाद simple form submit करना है।
अगर API का response false तब कोई problem है otherwise सब सही है।

Hi ! I'm Rahul Kumar Rajput founder of learnhindituts.com. I'm a software developer having more than 4 years of experience. I love to talk about programming as well as writing technical tutorials and blogs that can help to others. I'm here to help you navigate the coding cosmos and turn your ideas into reality, keep coding, keep learning :)
Get connected with me. :) LinkedIn Twitter Instagram Facebook
