If tutorials available on this website are helpful for you, please whitelist this website in your ad blocker😭 or Donate to help us ❤️ pay for the web hosting to keep the website running.
इस topic में आप सीखेंगे कि Laravel Application में REST Api कैसे बनाते हैं। बैसे तो Api response के लिए laravel API Resources use करने के लिए recommend करता है। लेकिन आप customizable functions बनाकर भी Api बना सकते हैं।
Note : Laravel में REST Api बनाने से पहले हम या मानकर चलते हैं कि , आपको laravel की basic knowledge है , अगर नहीं तो आप हमरी website पर पढ़ सकते हैं।
Api बनाने के लिए हम एक fresh laravel application install करेंगे।
composer create-project --prefer-dist laravel/laravel productapi
हमने एक नया project productapi बनाया है , जिसमे Products के लिए Api बनाएंगे।
project install हो जाने के बाद आपको .env file में database credentials set करना है। जिससे आगे migrations बना सकें।
File : .env
-----------

DB_CONNECTION=mysql
DB_HOST=127.0.0.1
DB_PORT=3306
DB_DATABASE=productsapi
DB_USERNAME=root
DB_PASSWORD=
database credentials set करने के बाद products table के लिए migration ready करना है , जिससे database में table बन सके।
php artisan make:migration create_products_table
ये command run करने के बाद database / migrations / datatim_create_products_table.php file open करें और नीचे दिया गया code replace करें।
File : database / migrations / datatim_create_products_table.php
<?php
use Illuminate\Database\Migrations\Migration;
use Illuminate\Database\Schema\Blueprint;
use Illuminate\Support\Facades\Schema;
class CreateProductsTable extends Migration
{
    /**
     * Run the migrations.
     *
     * @return void
     */
    public function up()
    {
        Schema::create('products', function (Blueprint $table) {
            $table->id();
            $table->string('name', 255);
            $table->string('category', 255)->nullable()->default(null);
            $table->text('description');
            $table->timestamps();
        });
    }

    /**
     * Reverse the migrations.
     *
     * @return void
     */
    public function down()
    {
        Schema::dropIfExists('products');
    }
}
इसके बाद run करें php artisan migrate
basically products table के लिए 3 fields define किये हैं - name , category , description बाकी के 3 fields id, created_at , updated_at automatically Laravel द्वारा create हो जायँगे।
अब हमें products table के लिए model बनाना है , model बनाने के लिए नीचे दी गयी command run करें।
php artisan make:model Product
इसके बाद Product model open करके table name define करें , बैसे तो Laravel automatically table names guess कर लेता है , लेकिन अगर table name अलग है तो आपको table name define करना पड़ेगा।
File : app / Models / Product.php
<?php
namespace App\Models;
use Illuminate\Database\Eloquent\Factories\HasFactory;
use Illuminate\Database\Eloquent\Model;
class Product extends Model
{
    // define table name
    protected $table = 'products';
    use HasFactory;
}
laravel application में Api के लिए सभी Controllers Controllers/Api folder में रखे जाते है , जिससे code clean और manageable रहता है। इसके लिए command run करें -
php artisan make:controller Api/ProductController
अब open करें और नीच दिए गए code को replace कर दे।
File : ProductController.php
<?php
namespace App\Http\Controllers\Api;
use Validator;
use App\Models\Product;
use App\Http\Controllers\Controller;
use Illuminate\Http\Request;
class ProductController extends Controller
{
    /**
     * function that will list all the products
     * @param Illuminate\Http\Request
     * @return JSON
    */
    public function list(Request $request)
    {
        $products = Product::get()->all();
        return $this->api_success_response("Success !", $products);
    }

    /**
     * function that will add a new product.
     * @param Illuminate\Http\Request
     * @return JSON
    */
    public function add(Request $request)
    {
        $rules['name'] = 'required';
        $rules['description'] = 'required';
        $validator = Validator::make($request->all(), $rules);
        if($validator->fails())
        {
            return $this->api_error_response("Invalid input data", $validator->errors()->all());
        }

        $store = $request->only('name', 'category', 'description');
        $product = new Product();
        $product->name = $request->name;
        $product->category = $request->category;
        $product->description = $request->description;
        $product->save();
        return $this->api_success_response("Product add successfully !");
    }

    /**
     * function that will update exist product.
     * @param Illuminate\Http\Request
     * @return JSON
    */
    public function update(Request $request, $product_id)
    {
        $product = Product::find($product_id);
        if(empty($product))
        {
            return $this->api_error_response("Invalid input data, product not found.");
        }

        $rules['name'] = 'required';
        $rules['description'] = 'required';
        $validator = Validator::make($request->all(), $rules);
        if($validator->fails())
        {
            return $this->api_error_response("Invalid input data", $validator->errors()->all());
        }

        $product->name = $request->name;
        $product->category = $request->category;
        $product->description = $request->description;
        $product->save();
        return $this->api_success_response("Product updated successfully !");
    }

    /**
     * function that will delete exist product.
     * @param Illuminate\Http\Request
     * @return JSON
    */
    public function delete(Request $request, $product_id)
    {
        $product = Product::find($product_id);
        if(empty($product))
        {
            return $this->api_error_response("Invalid input data, product not found.");
        }

        $product->delete();
        return $this->api_success_response("Product deleted successfully !");
    }
}
हमने response send करने के लिए app / Http / Controller / scontroller.php file में api_error_response() , api_success_response() custom functions बनाये हैं।
make changes in File : Controller.php
<?php
namespace App\Http\Controllers;
use Illuminate\Foundation\Auth\Access\AuthorizesRequests;
use Illuminate\Foundation\Bus\DispatchesJobs;
use Illuminate\Foundation\Validation\ValidatesRequests;
use Illuminate\Routing\Controller as BaseController;
class Controller extends BaseController
{
    use AuthorizesRequests, DispatchesJobs, ValidatesRequests;

    /**
     * Send response For API
     * @param String $message
     * @param Array $data
     * @return \Illuminate\Http\Response
     */
    public function api_success_response($message = 'Success !', $data=[])
    {
        $response = [
            'success' => true,
            'message' => $message,
            'result'    => (count($data) > 0) ? $data : new \stdClass,
        ];
        return response()->json($response, 200);
    }

    /**
     * @param String $error_msg
     * @param Array $data
     * @return \Illuminate\Http\Response JSON
     */
    public function api_error_response($error_msg ='Error !', $data = [])
    {
        $response = [
            'success' => false,
            'message' => $error_msg,
            'result' => (count($data) > 0) ? $data : new \stdClass,
        ];
        return response()->json($response, 200);
    }
}
जैसा कि आपको पता है कि laravel application में Api के लिए सभी routes routees/api.php file में रखी जाती है तो चलिए products add और other tasks perform करने के लिए routes define करते हैं।
File : routes/api.php
-------------------------

/**
 * define products routes
 * prefix : products so we do not need to prepend it every time
 * namespace : define namespace for api controllers
*/
Route::group(['prefix'=> 'products', 'namespace'=>'App\Http\Controllers\Api'], function(){
    Route::get('list', 'ProductController@list');
    Route::post('add', 'ProductController@add');
    Route::post('update/{product_id}', 'ProductController@update');
    Route::post('delete/{product_id}', 'ProductController@delete');
});
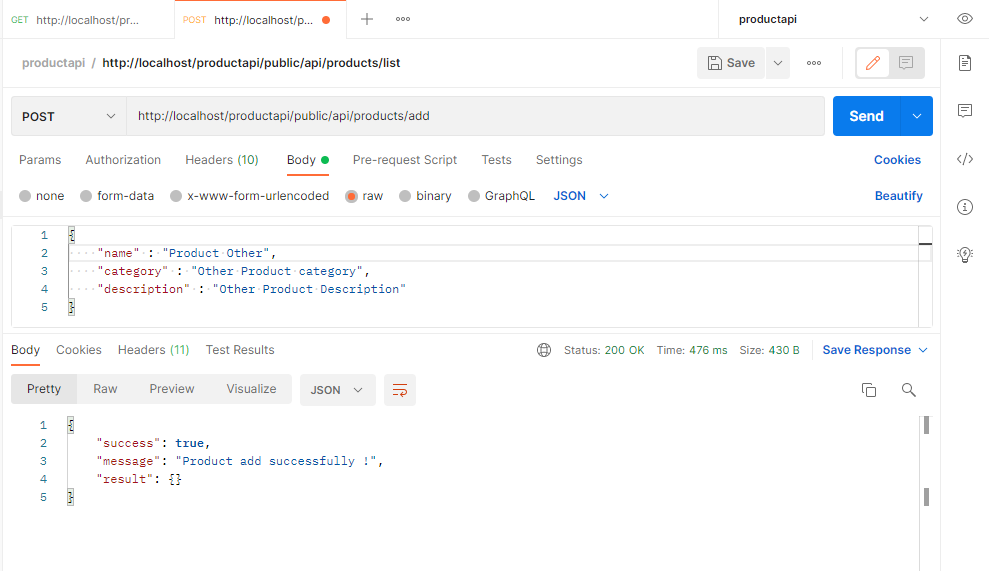
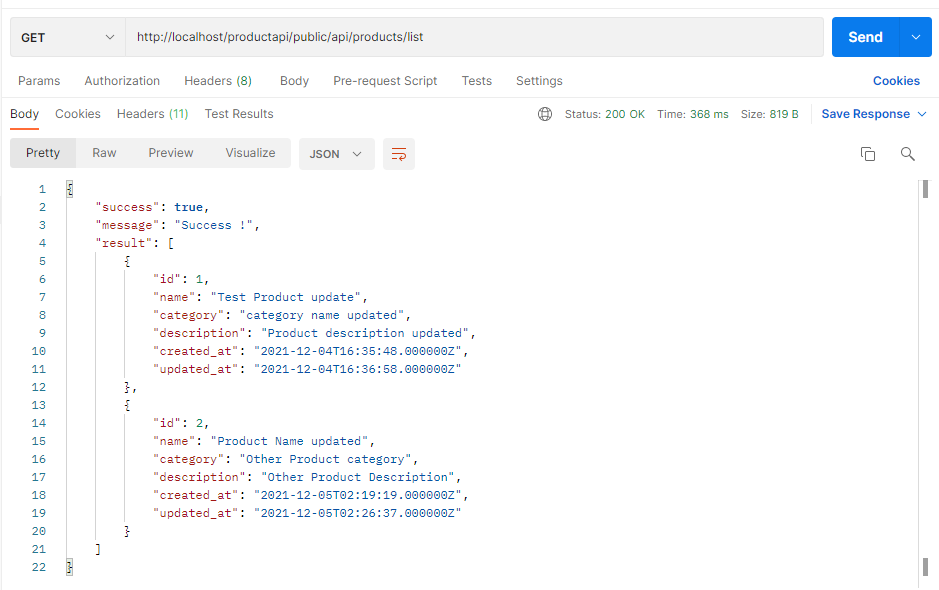
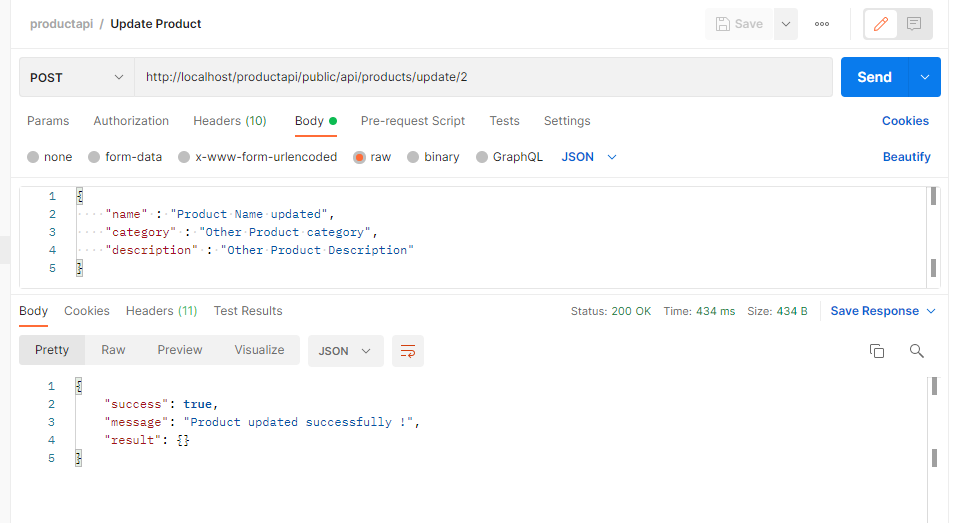
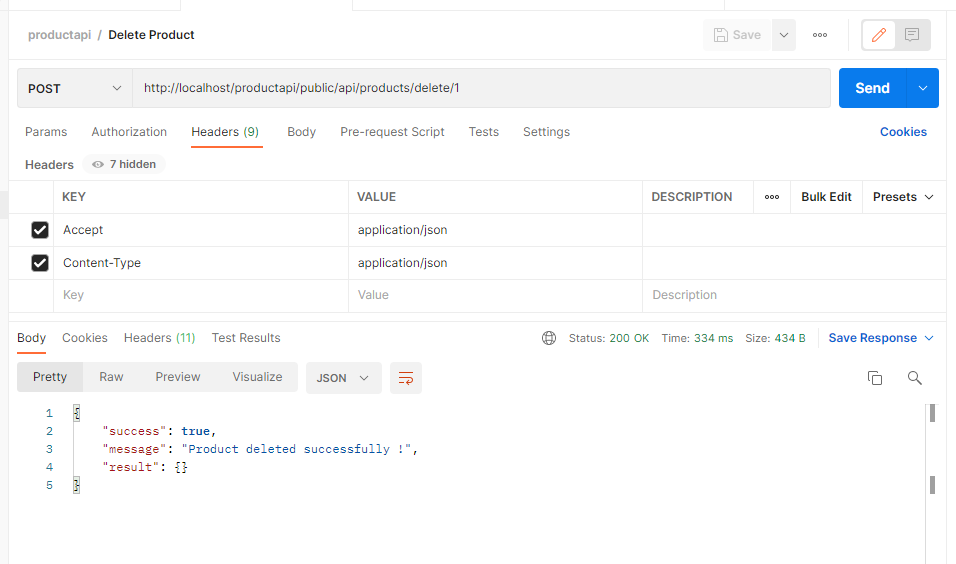
That's it, Laravel REST Api testing के लिए ready है , get request तो आप direct browser से ही access कर सकते हैं , लेकिन post urls के लिए postman या किसी और tool की help लेनी पड़ेगी।
request के साथ Accept:application/json , Content-Type:application/json जरूर भेजें।
हमने इस API को Postman की help से test किया है, जिसके कुछ screenshots नीचे दिखाए गए हैं।


Hi ! I'm Rahul Kumar Rajput founder of learnhindituts.com. I'm a software developer having more than 4 years of experience. I love to talk about programming as well as writing technical tutorials and blogs that can help to others. I'm here to help you navigate the coding cosmos and turn your ideas into reality, keep coding, keep learning :)
Get connected with me. :) LinkedIn Twitter Instagram Facebook